Wordless Wednesday

Every Wednesday I’m going to share a few shots from Instagram from the previous week to let you have a glimpse into our world. Go ahead and follow @mommyzoid for many more pictures!
www.mommyzoid.com www.mommyzoid.com www.mommyzoid.com www.mommyzoid.com www.mommyzoid.com www.mommyzoid.com

http://instagram.com/mommyzoid

Follow @mommyzoid on Instagram for more peeks into our world! 

DIY: Driftwood Chandelier

Driftwood Chandelier
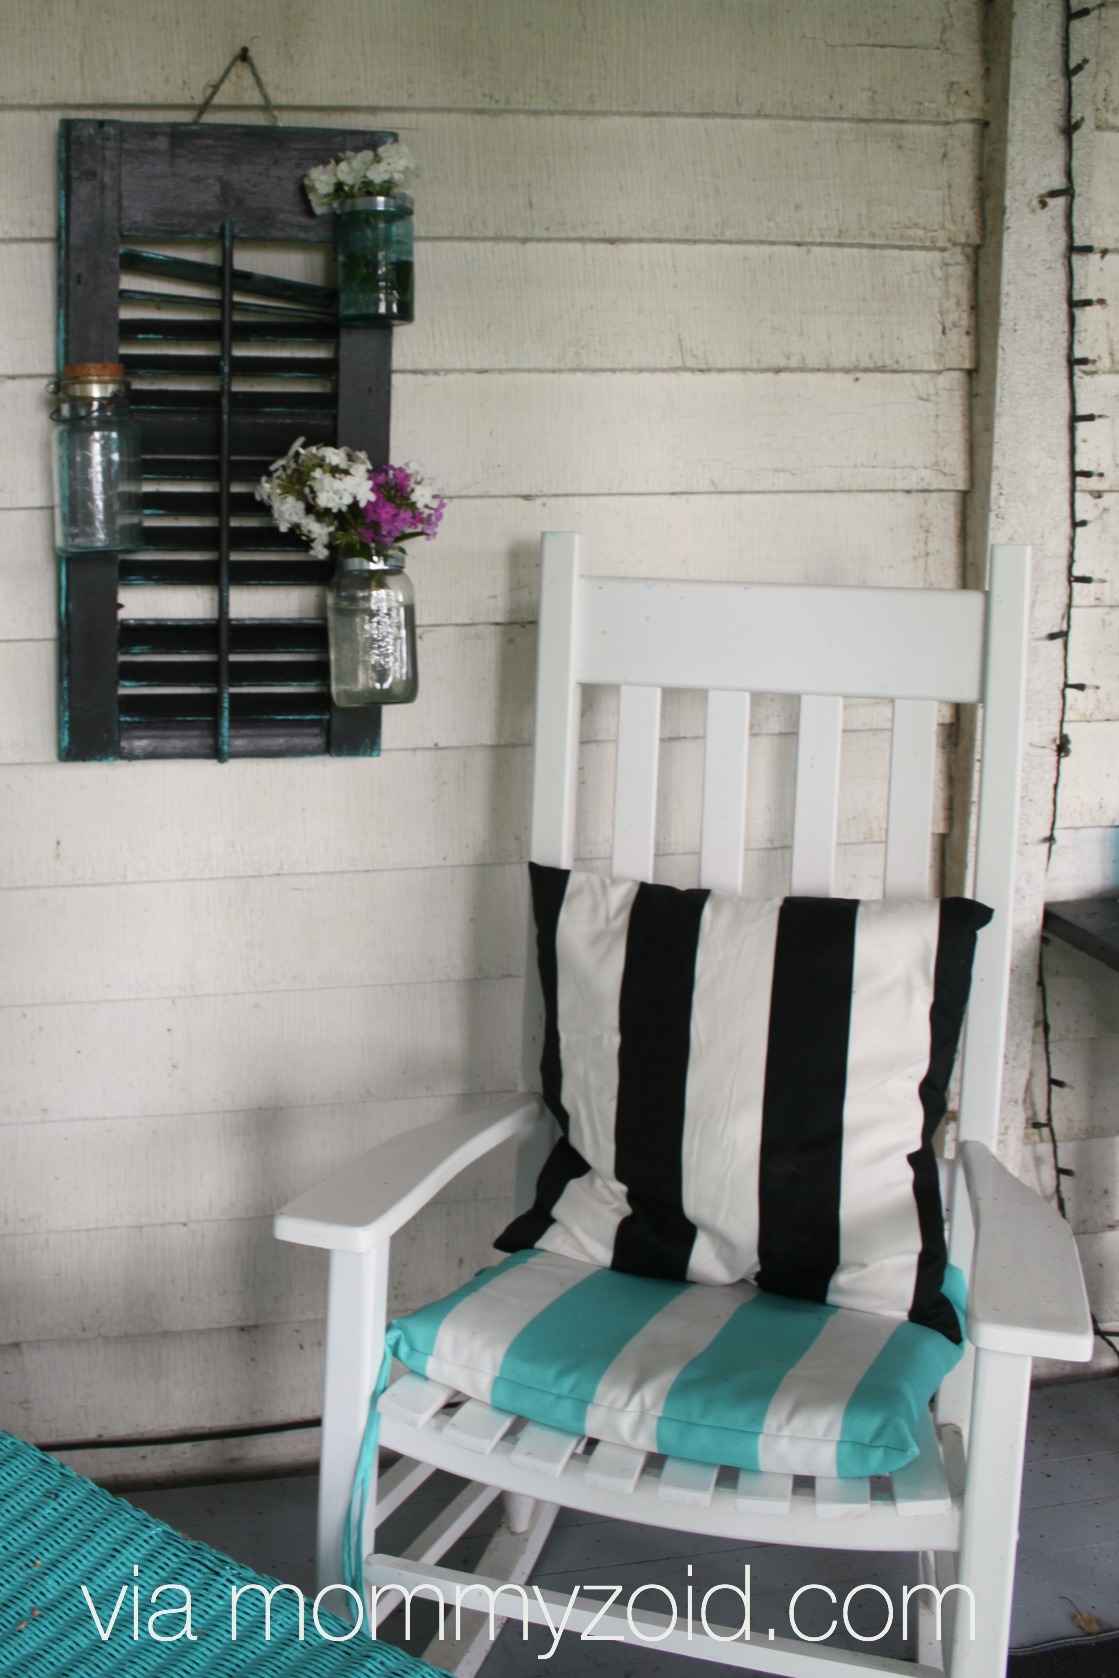
A welcome addition to the front porch of my families cottage is this driftwood chandelier, another DIY that makes something wonderful out of virtually nothing. With a few coats of paint, some fun outdoor throw pillows, and a few DIYs this porch has become the centre of attention. It has become a place that not only looks like it’s out of Cottage Life Magazine but feels warm and inviting. It’s a space that is conducive to gathering which is a popular activity at the cottage. Many a days have been spent reading magazines, doing puzzles, and hosting get-togethers under this here chandelier.

This cute DIY  is the brain child of my Mother in Law and my Husband with a little bit of know how and designing from my Dad and his wife. A family DIY! Neat! Without further ado, here’s what you’ll need.

  • Rope of prefered colour/size/length
  • Drill
  • 3 lengths of Light chain 
  • 3 Hooks
  • Hammer
  • Wood Staples 
  • Heavy-duty hook for ceiling 
  • 3 hanging tea light holders (ours are from IKEA)

First decide on a piece of driftwood to use. It can be as big or as small as you’d like. Remember it has to hang from the ceiling so you might want to take that into consideration.

Now this wasn’t an exact science, at least that’s the idea I got from the sidelines while watching this family DIY go down. I’m more of a thinker-uper than a get-et-done-er! Drill two holes wide enough for your rope to slide through and tie a tight knot or two large enough to keep the knot from slipping through the holes.

Driftwood Chandelier

On the underside of your piece of driftwood, use wood nails to secure your piece of chain. Make sure your chains are evenly spaced for balance purposes but again, it’s no science. Eye ball it!

Driftwood Chandelier

 Now fix those hooks on the end of  the light chain (this is where you’ll hang those little lanterns).

Driftwood Chandelier

Next comes the finicky part and that’s hanging up the chandelier so that it’s balanced and doesn’t look lop sided. That’s where my Dad came in. He adjusted while the women stood back and said, “A little more on the left… no….stop…OK….nope, MORE!!”

and TA DA. Isn’t it cute?

Driftwood Chandelier I’ll be sharing this DIY on these amazing blogs! 

mommyzoid sig w name

What’s in Our Diaper Bag?

Diaper Bag Tour -- www.mommyzoid.com

I have always been one to either forget all the important stuff or over-pack. Thankfully since becoming a mom, I’m doing more of the latter and less of the former. When it comes to our diaper bag, I am a stickler for keeping it organized and having a place for everything. The Ju-Ju-Be Be Prepared makes this possible. It’s got more pockets and pouches than you can shake a stick at.

For a cloth diapering family, this bag gives us ample room to stick all those big fluffy diapers. Our previous bag wasn’t cutting the mustard when it came to carrying cloth diapers. Either the diapers or the bag had to go and guess who stuck around. The bag comes from JuJuBe’s new Legacy line. The whole line is very elegant and classy. I love that they are very neutral in colour (read: go with anything). This bag is my new purse so it can’t clash with my outfit, ya hear?

Diaper Bag Tour -- www.mommyzoid.com

If you think the outside of the bag is insanely awesome and to die for, the inside will blow your socks off!

Diaper Bag Tour -- www.mommyzoid.com

In the top pouch we keep garbage bags and our wet bag. I made this wet bag using scrap fabric from our decorative throw pillows on the couch and it’s lined with PUL which is a waterproof fabric used in the cloth diapering world.

There are four pockets on the top of the inside of the bag. In one of them we keep a change of clothes (onesie, socks, shorts, etc.) and in another we keep sunglasses, a hat, and a bibdana. On the other side of the bag we keep Homemade Organics by Jen diaper cream, back up soothers, baby tylenol, a liquid tylenol syringe and some baby wash clothes for messes.

Inside the main bag we keep a “hooter-hider” for breastfeeding, an Aden + Anais swaddle blanket , a jacket or sweater, several Charlie Banana cloth diapers, back up disposable diapers, Huggies Clutch N Clean , and of course Sophie the Giraffe.

Diaper Bag Tour -- www.mommyzoid.com

There are two pouches on the inside perfect for bottles. We usually stash some Enfamil single serve packets along with some empty bottles. On the outside of the bag there is an insulated pocket on either end of the bag I use to hold pumped breast milk with a small ice pack to keep it cool.

bagtour6

On the very front of the bag is the “mommy pocket”. In it I keep my car keys, wallet, coupons (such a mom!), cell phone and sunglasses.

Diaper Bag Tour -- www.mommyzoid.com

Diaper Bag Tour -- www.mommyzoid.com

Wooph. That’s a lot of stuff. But such is the life of a mom, am I right?

What are your diaper bag must haves? Do you think I pack to much!?

mommyzoid sig w name

PS:  I’ll be linking up here with hundreds of other bloggers to share our work!

DIY: Repurpose an Old Shutter

Repurpose an old shutter with mason jars to create a flower wall via www.mommyzoid.com
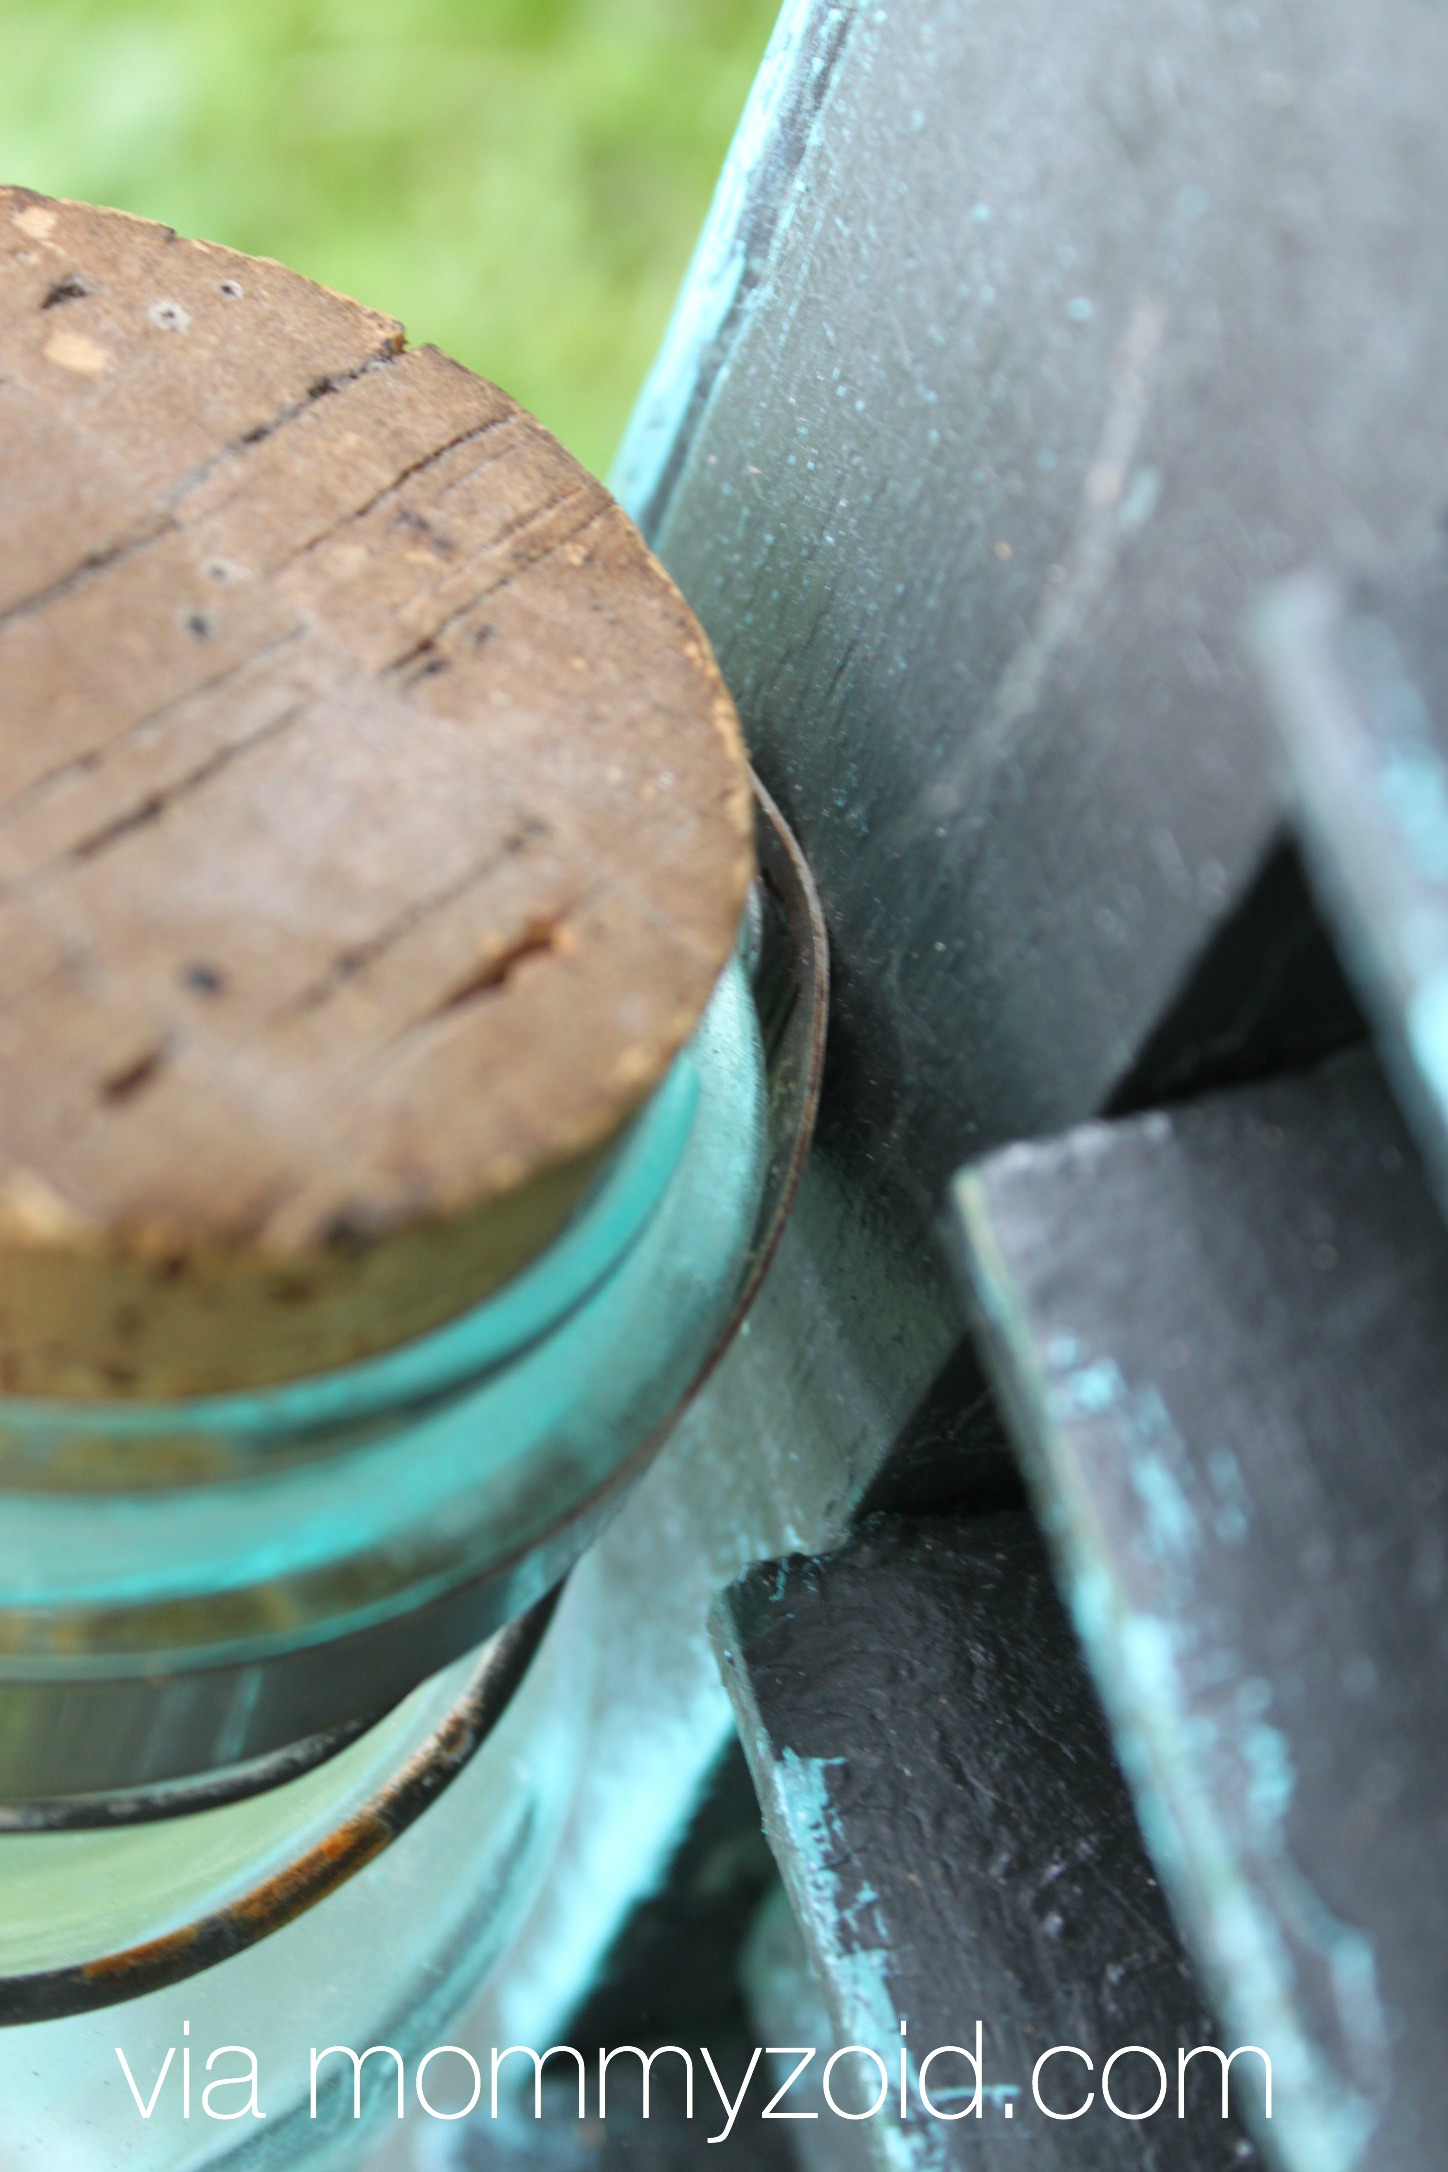
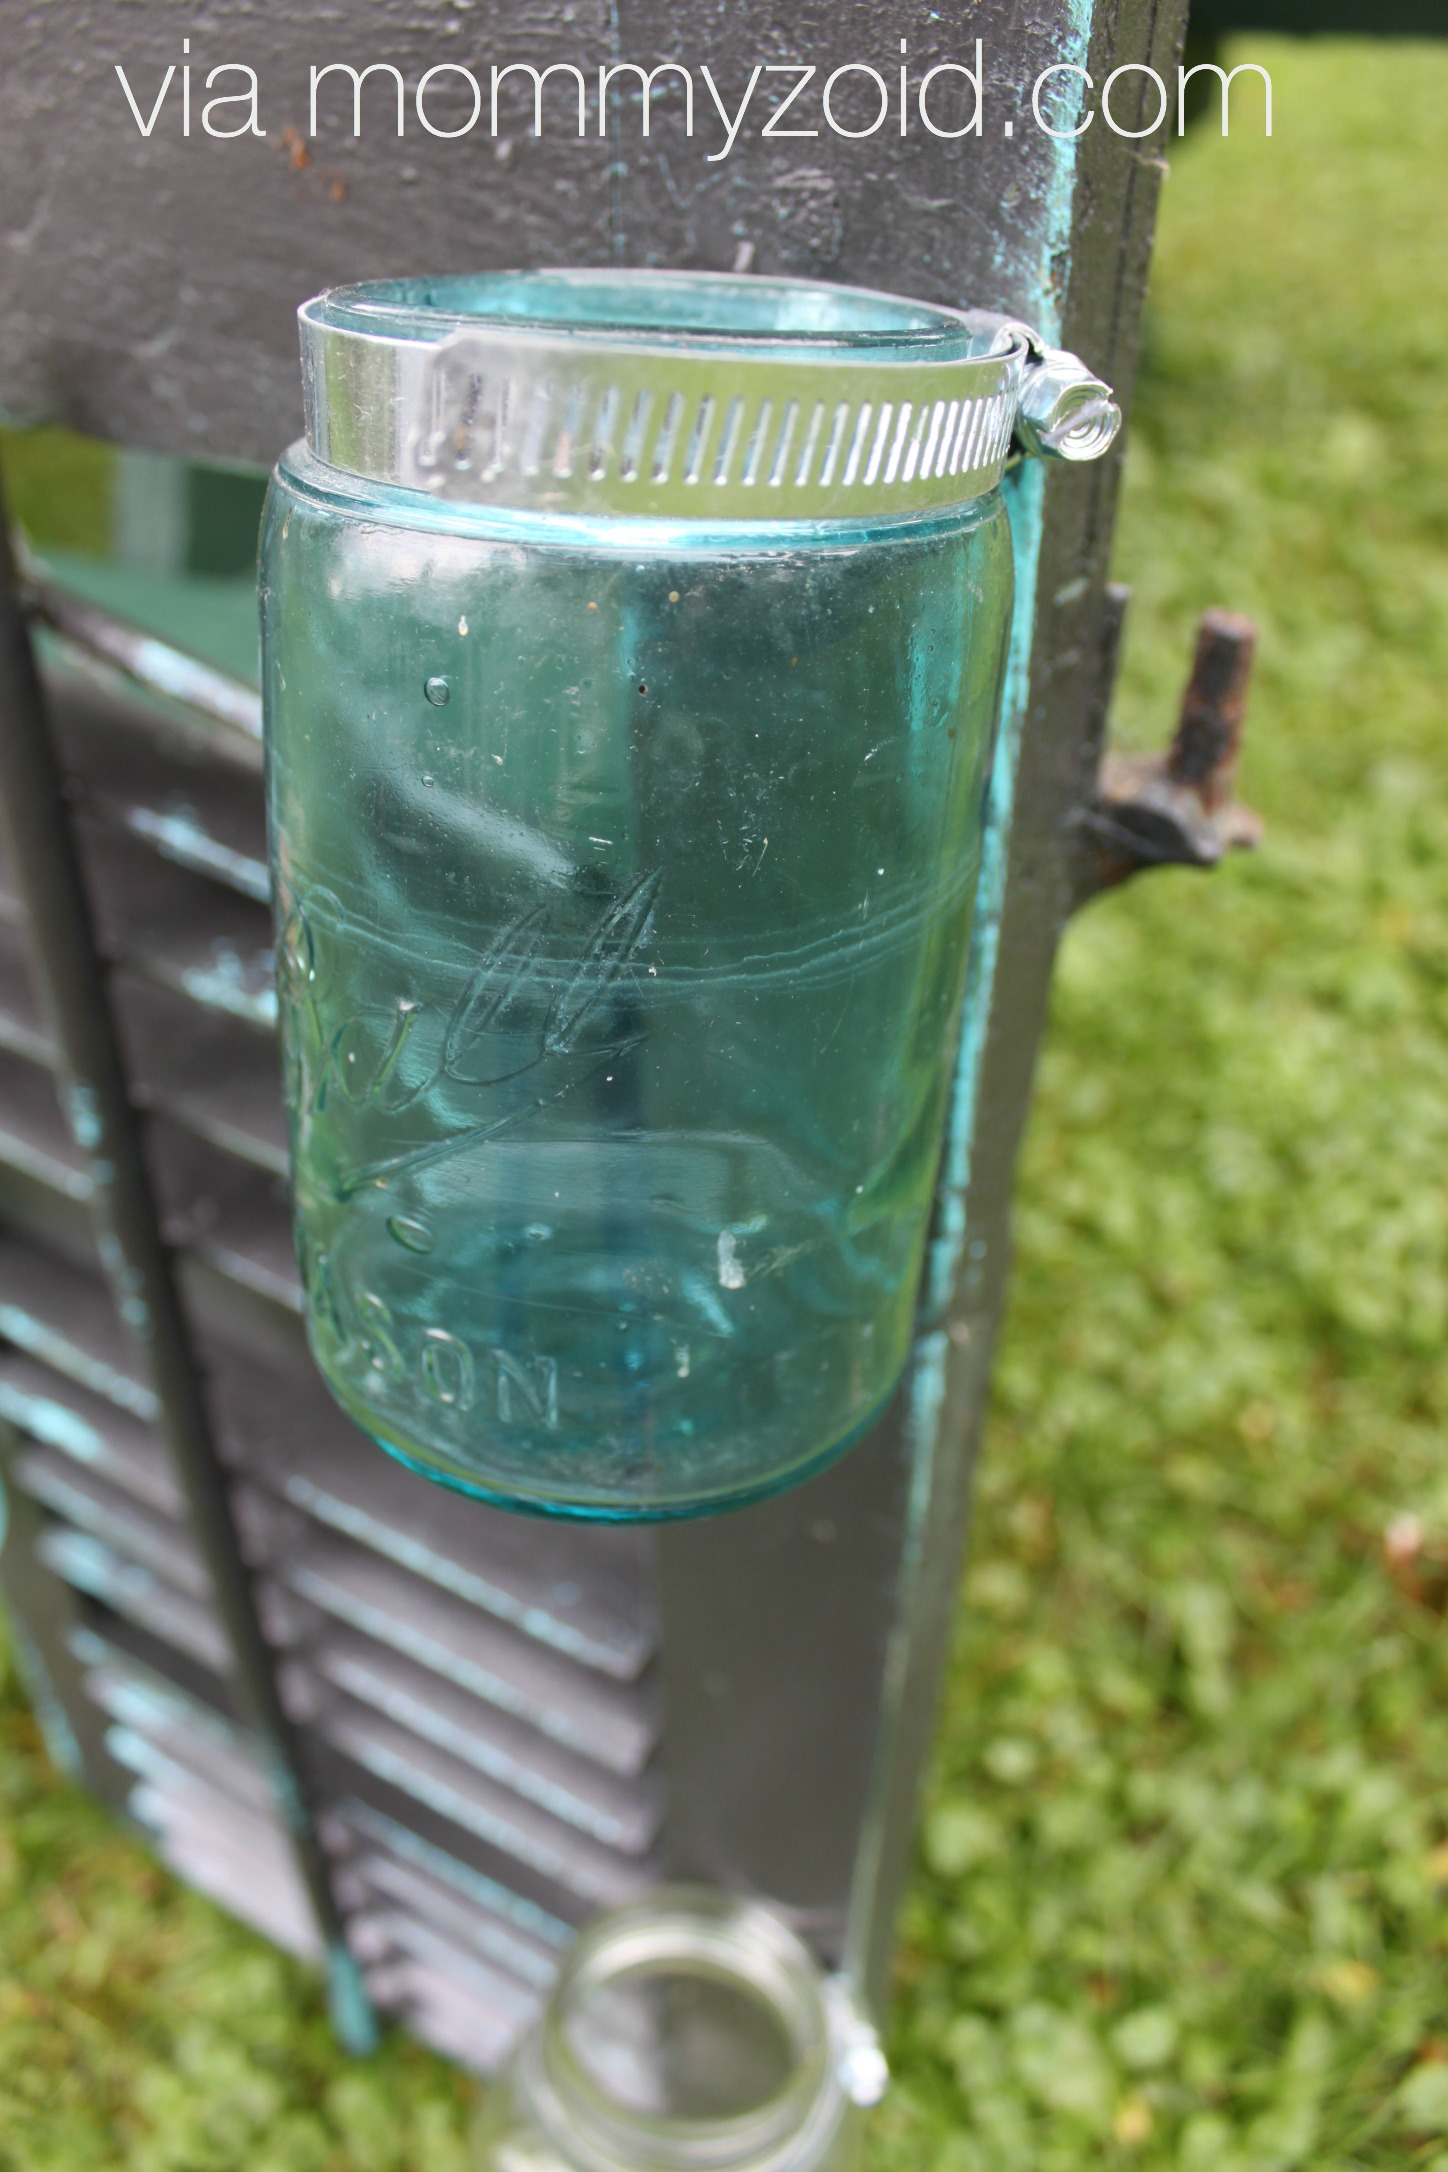
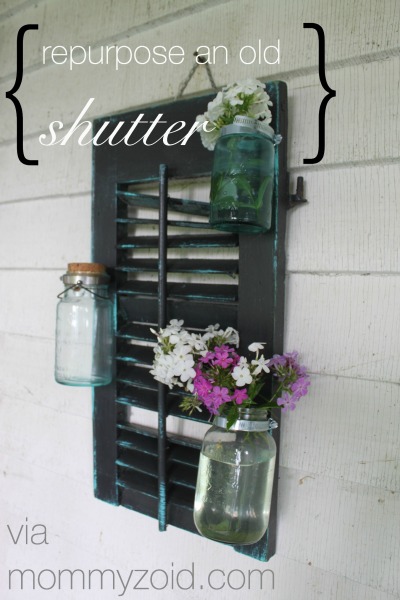
While spending the first few months of my maternity leave at my families cottage, I wanted to do as many DIY’s as I could possibly cram in. My favourite so far has been this shutter that was going to be tossed in the burn pile but I managed to snag it and spiff it on up. This entire project was actually done 100% using items found at the cottage. I love this project because it was free, I recycled and reclaimed, and it looks just so darn cute on the front porch. It’s a fantastic way to jazz up a wall with a punch of colour.

To make one of these beauties for yourself you’ll need:

1 shutter that’s ready for a new life as a wall hanging

Paint of your choosing

Desired length of chain for hanging

2 screws for chain

3 mason jars of various sizes, shapes, and colours

3 jubilee clamps found in the plumbing section of the hardware store

3 screws for jubilee clamps

drill


First I took my shutter and gave it a nice coat of flat black paint and let it dry thouroughly. Then I took my turquoise paint and just feathered the edges to give it a worn effect. I set the shutter aside to dry completely. You could take a light grit sand paper and rough up the edges a bit or leave it as it is.

Repurpose an old shutter with mason jars to create a flower wall via www.mommyzoid.com

On the back of your shutter you’ll want to put a hanging mechanism of some sort. I opted for some chain and screwed it in on either side at the top of the shutter. Chain is a great option for hanging something of this weight.

Repurpose an old shutter with mason jars to create a flower wall via www.mommyzoid.com

Next I decided where I wanted to place the mason jars on the front of the shutter. I took my jubilee clamps and my screws and got right to screwing these puppies right where I wanted to. This part can be tricky so you might want a hand from an assistant to steady the jubilee clamp while you drill.

Repurpose an old shutter with mason jars to create a flower wall via www.mommyzoid.com

Slide the mason jar into the jubilee clamp and tighten the clamp tight enough that the mason jar doesn’t fall out when its hanging on the wall.

Repurpose an old shutter with mason jars to create a flower wall via www.mommyzoid.com


Repurpose an old shutter with mason jars to create a flower wall via www.mommyzoid.com

Repurpose an old shutter with mason jars to create a flower wall via www.mommyzoid.com

Repurpose an old shutter with mason jars to create a flower wall via www.mommyzoid.com

Hang up on a hook, fill with water and some fresh cut flowers, and enjoy your repurposed shutter!

Is this something you’d want to try? What colour would you paint your shutter?


I’m sharing this post on these blogs! Take a peek and see what’s happening in blogland!!

and while you’re at it, follow along with me on social media to get a heads up on my next projects.

  mommyzoid sig w name

Diaper Laundry: Our Routine at the Cottage

Cloth Diaper Laundry: Cottage Edition via www.mommyzoid.com


We’ve been using cloth on Oliver since he was one day old and I don’t think either of us would have it any other way. It’s been so simple and not as stressful as one would expect. One area you can run into issues is when it comes to washing those suckers. If not done correctly, you can get a whole bunch of different problems that can be annoying to try and trouble shoot. I’m by no means an expert when it comes to cloth but I am learning as we go.

Cloth Diaper Laundry: Cottage Edition via www.mommyzoid.com

For the first few months of our son’s life, we have been living at our families cottage. The cottage does have a washer and dryer which has made things seamless for continuing on with cloth even while we’re not at home. The only downside is the water come straight from the lake so it can have a bit of an odour.

Cloth Diaper Laundry: Cottage Edition via www.mommyzoid.com


Cloth Diaper Laundry: Cottage Edition via www.mommyzoid.com

Our routine has been working really well for us. We’re using older style top loaders to do our wash. This matters because the old guys tend to use more water than the new fancy high efficient guys. More water = better in the cloth diaper world. We do a nice cold soak for 30 minutes and end with a spin. Then we do a hot wash, cold rinse, and spin with 2.5 scoops of Nellie’s All Natural Laundry soda We love that Nellies has nothing harmful in it like fragrances or dyes because lets be honest, these diapers touch some pretty sensitive areas. After this we might do another cold rinse and spin to make sure all the soaps out. Then it’s out on the line for a nice sun bleaching or into the dryer if it’s a rotten day. Did you know the sun has the ability to get stains on bright white again? I didn’t know this until I began  cloth diapering. *PRO TIP: sun bleaching works best when the articles are wet.

Cloth Diaper Laundry: Cottage Edition via www.mommyzoid.com


Cloth Diaper Laundry: Cottage Edition via www.mommyzoid.com

Easy peasy lemon squeezey! No, we don’t spend half our days doing diaper laundry. It takes up minimal time and saves us SO  much money. We love cloth, it’s worked well for us, and we hope you love it too!

Are you debating using cloth diaper on your children? What are some reasons why you wouldn’t cloth diaper?

Happy Cloth Diapering!

mommyzoid sig w name

Recipe: S’more Pops

S'more Pop Recipe -- mommyzoid.com


This summer our friends decided to have a “Things-on-a-Stick” themed party and it was as yummy as you’d expect! I expected a tonne of meats on sticks but was pleasantly surprised to see the most delectable desserts on sticks. My favourite of the night was S’more Pops! They were so classy looking and zero mess. Perfect treat for the kiddies. Without further ado, here’s how it’s done.

S'more Pop Recipe -- mommyzoid.com

Ingredients:

1 cup of chocolate chips or chunks of choice

1 heaping spoon full of peanut butter

Large marshmallows (as many as you’d like to make)

5-ish Graham Crackers, crushed

Small pot with about a half inch of water

Heat proof bowl

Popsicle sticks

 S'more Pop Recipe -- mommyzoid.com

Instructions:

Crush up the graham crackers on a plate. I like to use the bottom of a glass cup or measuring cup to smoosh them up really fine.

Cram your popsicle sticks (or tooth picks) into the marshmallows without puncturing all the way through.

Slowly heat up your pot of water with your heat proof bowl inside on low heat. This is called a “double boiler”. Prop tip…it works way better than quickly melting it in the microwave because it wont harden as quickly. Add your chocolate chips and peanut butter, stirring them together as they melt.

Dip your marshmallow in the chocolate, careful not to melt the ‘mallow! Use a spoon to help smooth the chocolate coating out. Take care to cover the base of the ‘mallow where the stick is stuck in to help keep it on the stick.

Before it dries and hardens, roll the deliciousness in the crushed graham crackers and set up-side-down on a plate to dry and harden. Stick in the fridge to harden even quicker.

ENJOY!

*Campfire optional.

Substitutions: Roll in peanuts or shredded coconut to jazz them up a little!

S'more Pop Recipe -- mommyzoid.com

Find this recipe and many other DIYs here.

mommyzoid sig w name

3 months

Little Ollie is growing up right before our eyes. We are really enjoying celebrating his milestones. 

IMG_8391

This last month he’s really started looking at our faces and is really recognizing family. He knows that faces are how we communicate. He scans up your body until you reaches your face then gives the biggest gummy grin. TOO CUTE. 

He’s also getting extremely strong in his legs. He was always really strong and always liked standing up and weight barring. 

IMG_4561

He had his first laugh this month! Daddy and I were playing with him and laughing when all of a sudden he gave a little chuckle. It wasn’t like his usual cooing and talking it was a “HUH HUH HUH!!”. We started laughing and he did it again! Priceless. Then I bawled my eyes out. SLOW YOUR GROWING DOWN, SON.

He’s been sleeping longer and longer at night. He went from 2 feedings at night to 1 to sleeping ten hours straight! It’s been a remarkable month, sleep wise. 

He is SO alert and always chatting away. I love hearing him babble and blow bubbles. He’s  super happy and very calm. He’s happy to just chill out and take in the sights and sounds.

IMG_4582 

Nursery: Reading Nook

Ollie’s nursery was well on it’s way to being completed many months ago, well before he was even close to being fully cooked. We knew if it didn’t get done before he was born it would never be completed. Now that he’s here, I’m gathering ideas to put the finishing touches on the space.

Baby Boy nursery ideas

Baby boy nursery ideas

Words I would use to describe the feeling we are going for:

  • Fresh
  • Bright
  • Clean lines
  • Cozy/Cuddly
  • Nature/Natural

With fall on its way I know we will be spending more than our fair share of days indoors and I want to get his room feeling like a place where we’d want to spend our days laughing and learning together. My answer to that is to create a reading nook. Reading is an activity we’ve shared together as a family since he was in the womb and now that he’s here we cuddle together every night before bed and read some stories and he stares at the pictures. It’s so lovely.

I want to be able to have a few books on display, almost as art work. I want to use a piece of dancing moulding as a ledge to rest the books against the wall without them toppling over.


curtesy of mommo-design.blogspot.it

Our comfort is key or else the space is useless. Big feather stuffed pillows with geometric patterns in bright colours will cover the area so we can lay down and snuggle.

Curtesy of annipalanni.blogspot.com.es

I can picture a little reading teepee in the space but from what I’ve seen in the blog world, the traditional teepee shape takes up some valuable real estate in terms of Ollie’s room. I’m going to need to fan-dangle it so it can fold up and be put in a closet or behind the door!

curtesy of jenandjercook.blogspot.ca

Are you noticing a theme here? BLACK AND WHITE STRIPES! We are really loving the simplicity. Not to mention you can pair it with any other colours and it looks great. It’s so classic and clean!

A trip to IKEA is in our near future. I’ll update you once things come a little further together.

August Favorites

With the summer coming to an end, I thought it would be appropriate to share what we’ve found has worked well for our family so far:

unnamed

Boba Organic Carrier | JU*JU*BE BePrapared Nellies Laundry Soda | Snuza Hero | Aden + Anais Bamboo Swaddle


Boba Organic Cotton Carrier

When I need to use both my hands, I put Ollie in the Boba and away we go. The first time I used it, I nearly cried. When you spend all day alone with a new baby, you tend to skip out on important things like peeing. It sounds crazy but once you’re a mother, those little things go on the back burner. Having a hot, sit down, lunch was the nicest treat! Babies love to be carried close and tend to doze off when in that position. Thank you, Boba.


JU-JU-BE BePrepared

I nearly had to sell a few organs to afford my new diaper bag. But I’m in love. It was a treat yo self kind of splurge. The thing I didn’t realize about diaper bags is that they become mom’s purse! That bags with us wherever we go. My previous diaper bag was way too small, especially for his massive cloth diapers. I know we will still be using this bag for years to come. It also makes a great overnighter or carry on as there is no tell tale diaper-bag-ness. Yup, worth every penny!


Nellies All Natural Laundry Detergent

We wash all Oliver’s clothes and diapers in Nellies. Maybe it’s a baby thing but he gets red and rashy very easily, although the marks never last long, it’s great to know it isn’t our laundry detergent that’s causing it. A bonus is P’lovers in Kingston (where we are staying with babe for the time being) refills the tins at a discounted price! Lets hope P’lovers in Halifax does the same…


Snuza Hero

I can’t say enough about the Snuza. This little sucker clips onto babies diaper while sleeping and will vibrate and sound an alarm to alert us that baby isn’t breathing. This helps us sleep at night knowing if anything were to be happening to him in his crib, we would wake up and help him. I would recommend this to any mom that wants to get a few peaceful hours of sleep.


Aden + Anais Bamboo Swaddling Blanket

We never really swaddled our newborn but when we did, it was in an Aden + Anais. These suckers are as soft as butter, look amazing, and double as a great scarf! I love cuddling with his blankies. When he naps, I curl up with one of these and snooze right along beside him. These make a welcome addition to any nursery.

fail to plan and plan to fail

Husband and I decided to take babyzoid into town. Remember town = a boat ride away. and I’m not talking about a ferry boat here. We take a little pleasure craft across Lake Ontario into Kingston. Don’t ask me about what kind of boat. All that matters is that is floats. 

IMG_4192


So in order to go into town with the 3 month old, we need:

  • stroller
  • car seat
  • diaper bag
    • 3 cloth diapers
    • wet bag
    • 2 changes of clothes
    • blanket
    • sophie
    • sou-sou (sp)
    • pre-pumped milk
  • life jacket
  • ear muffs (boats are LOUD)

Now pre-baby we could decide at the drop of a hat to zip into town for ice cream or grocery shopping. Now I have to do as much planning, packing, and preparing as one would do for a 2 week vacation. Not really, but sometimes it feels like it. 

Now I have to worry about things like: WHAT IF IT RAINS? WHAT IF IT GETS TOO HOT? WHAT IF WE RUN OUT OF GAS FOR THE BOAT? WHAT IF WE CAN’T EVER GET BACK TO THE ISLAND AND HELL FREEZES OVER? You know, regular mom stuff.

But the planning and preparing is essential in order to have a successful outing. If I wake up early and rush around getting everything in order, everyone has fun, no one cries, and we all live to tell the world. Now if I’d wung this trip and didn’t prepare it wouldn’t have been such a success. Invest your time wisely and it will give you a good return!